| |
| Home |
| Starter Trees |
| Bonsai |
| Yamadori |
| Accents |
| Services |
| Special Offers |
| Tutorials |
| Book & DVD Reviews |
| Links |
| Contact Us |
| Creating Driftwood |
Carving Jin & ShariJin, Shari and Saba-miki are terms that you come across as you get further into bonsai. The idea of creating deadwood is seen as undesirable by some people but, in reality, it is just another small part in the armoury of illusion that can be used to good effect IF it is done well.The Internet Bonsai Club discussed this topic in detail. I have used this starting point, distilled the rudiments suggested by Herb Gustafson and Walter Pall, added my own experiences and those of some others. During styling, any area that does not contribute to the design must be cut away If a branch or apex is not needed in the design, instead of removing it completely, ask yourself - would the tree benefit from the appearance of a struggle in nature, that has caused the area to die back? If so, then the wood is exposed, by cutting off the bark, and shaped to resemble the deadwood that can be seen in nature.People all have different experiences of trees. Some don’t really look at them and have noticed well-maintained street-trees or the pristine examples sheltered in parks and arboreta. Others may have travelled widely and taken in all the detail from many distinct environments...... “There has been much said about whether deadwood on a bonsai looks “real” or “artificial.” One problem I have with this concept is the idea that deadwood looks a certain way, and only a certain way, in nature. My experience says this is not so. Different species of trees rot differently and they do this according to the climate and altitude. I have seen dead pine-wood, at very high altitudes in the Colorado Rockies, that was literally sand-blasted by ice crystals to an unbelievable smoothness, with ridges following the grain that stood out like knife blades.
Learning can begin with practise on discarded pruned branches, fixed in an upright position. The smaller power tools that are made for hobbyists aren’t really suitable for anything other than tiny detail work, finishing and refining. For bulk wood removal it is more effective to use a heavier duty (500 Watt or more) tool. Be aware that these are very dangerous if used incorrectly. 6 or 8 mm bits are the most suitable. Bits with multiple-wings, diamonds or burrs clog. Two-winged bits can be used at very high speeds, more than 20.000 r.p.m. and only with powerful tools (500 Watt or more), otherwise they jump alarmingly. Select the correct extra-hard metals bits, such as those made of Titanium. Bits designed for carving soft metals, like aluminium, work better on moist wood than the ones designed for wood-carving. These bits are costly but worthwhile. Some of the shaped bits for edging furniture parts are good, particularly if you are reducing large areas of wood. Samurai and Tornado bits are expensive but excellent if you carve a lot. They are used at 10,000 to 12.000 rpm and remove moist wood more cleanly than other tools. Steel-wheel tools with chainsaw teeth are also useful for initial roughing out and they are not too expensive. Stages:1) Choose your location carefully as you will produces masses of wood particles strewn all over the place. You may wish to protect the root zone with a cover of foil. 2) Roughing out: Remove the bark from the area to be jinned with a knife or chisel. Do the main shaping with larger router-bits. When you begin to work with a power tool, make certain that you grip it securely and anticipate the jump as the bit “bites”. Use both hands, but rest the secondary hand, or part of it, on the “work piece”. This has a dramatic effect on precision and overall tool control. Work slowly and thoughtfully, keeping distinct aims in mind. Attempt to emulate nature. Don’t allow the tool to dictate the effect, but be ready to put it down and try another approach. Aim for a mixture of coarse and smooth-textured areas. Where it is smooth it should be sanded or scraped very smooth. Where it is coarse it should be broken and not just pierced by rounded hollows. The patterns created should follow the logic of the material that you are working. Look very carefully at the pattern of the grain. Old dead wood is a record of the breakdown of the harder and softer tissue layers of the tree. The harder the wood, the more remains. Good carving exaggerates the junctions between trunk and branch. Knots where branches have failed or been removed also provide harder projections. Hollows should skirt these harder areas. Fractures on the outside of curves are across the grain. Hollows are carved by cutting back where wood could logically have rotted and must be self-draining when finished.  Deadwood often bears the ravages of insects - the sapwood grooved by insects that lived under the bark and heartwood riddled with the holes of borers. You can create taper in a chopped trunk or make a branch narrower by reducing the deadwood but don’t try to create branchlets or shapes that never existed. The strength is just not there and pieces will soon fall off. It is more convincing to incorporate a small, detailed piece of natural deadwood as a “phoenix graft”. 3) Refinement: Work with sandpaper manually or use a Dremel with the small sandpaper cylinders. Take off the rough particles and smooth the design generally. 4) Second trimming: Now you have an overview of the initial result. Refine it with sharp, smaller bits and a strong machine. 5) As you near the finish that you require, be careful about the tool marks that you are leaving. This is a crucial part of the process. Shave the surface with a shard of glass, sand-paper it, use brass or steel brushes, sear with a pen torch or blowtorch to remove fibres, even a shot-blaster could be employed. Aim to refine details and clean out any small particles. Use a sharp knife or chisel to tidy the bark at the edges of the shari or jin. Don’t cut an unnaturally straight line, but follow irregularities in the bark. It is easy to end up with the appearance of a sharpened pencil! Using jinning pliers, to tear the ends of “broken” branches or apex, gives a more natural appearance.   “Ernie Kuo demonstrated that by gouging up a small thread of the grain, and then peeling that section down the length of the exposed portion of the jin, that the thin, deep hollows created show off the beauty of the grain. The result was a jin that had all the movement of the original growth. The greater detail and depth literally “leapt” out at the viewer. Ernie told us that Kimura often uses power tools, of various sorts, to reduce and initially shape his wood carving. He then uses small gouges, jin pliers, and the points of his concave cutters and shears, to do the detail work, grain exposure, and to create movement along the jin and shari. Afterwards, he has a sand blasting booth, complete with bead recovery system, to blast the woodwork clean and smooth. Kimura doesn’t use sand, but rather glass beads or crushed nut shells, as his blasting medium. It is with this technique that he is able to bring out such incredible detail, shape, and movement, as well imparting to the carving a very smooth, even, weathered appearance.” David S Flagg. Once completed, preserving the deadwood is necessary or your design work would rot away. Lime sulphur is traditionally used. This bleaches the wood an unnatural, even, bright-white. Most natural deadwood is more muted and has varied silver tones. Study the patina of natural examples. Experiment on scraps of dead wood with small quantities of sumi or other black ink added to the lime sulphur, until the desired tones are achieved. Be aware that fungi, lichen and mosses can be used to contribute a wealth of different textures and colours but preservatives such as lime-sulphur kill them and prevent them from returning. 6) Revisions: After a few months or years the carving should have developed a nice patina. Now critically review your carving and refine it if necessary. All jins and shari must look natural: Observe natural deadwood to learn what you should be aiming for and watch bonsai artists to learn the techniques.  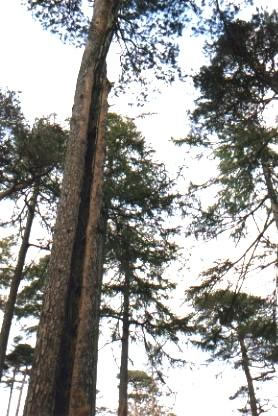 “I don’t believe there is one ubiquitous rule concerning the creation of deadwood except, “Make it natural.” By “natural”, I don’t mean boring or plain. Anyone who has even briefly examined the amazing shapes of deadwood found in the wild will agree that no human design could ever outdo the forces of nature in creating fantastic shapes, textures, and movement. Natural, to me, means “lacking artifice”. Walter Pall calls this “The Ten Foot Rule”. If one stands ten feet away from a bonsai, the deadwood should be indistinguishable between man-made and nature-made. Even at a distance of two feet Walter’s trees seem totally natural. It’s only upon minute inspection one can detect that he has carved out individual grain lines to accentuate and reinforce the movement created through judicious and artistic carving. Lots and lots of work, but the result is spectacular.” David Bockman 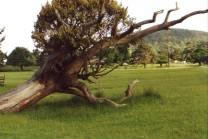 Aim to finish with a tree that looks consistent, with due attention paid to the environmental and biological factors that are suggested by its design. Often less deadwood makes more sense. 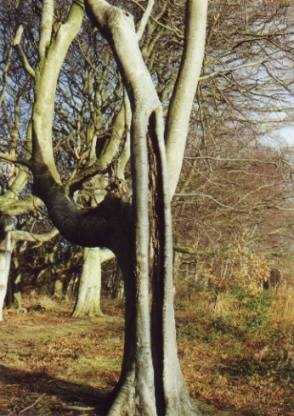
Jin - deadwood apex or debarked apex saba-miki - split trunk revealing mackerel like inner structure shari-miki - weathered trunk showing deadwood Web URL’s David Bockman Herb Gustafson Walter Pall Dan Avrin Photo’s, illustrations & text © Kevin Bailey 2008
|


